
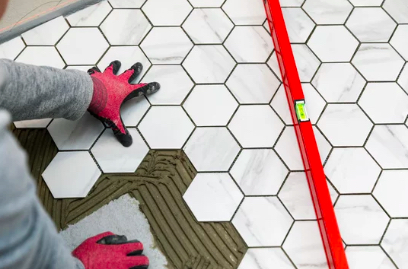
Tile comes in a wide variety of styles and colors. Many are shaped differently, providing a unique style or pattern for your project. Start by finding the center of the room, both width and length-wise. Snap a line, then dry lay (installing tiles without adhesive) rows of tile to plan your layout.
Substrate
Tile Installation Jacksonville FL substrate is the base the tile is installed over. It can be a wood or plywood subfloor, backer board, or uncoupling membrane. The type of substrate used can change depending on the type of tile and its location in the house. For example, stone tiles typically require a different type of substrate than ceramics. Likewise, showers usually require a special waterproof substrate that might be sheet or liquid membranes.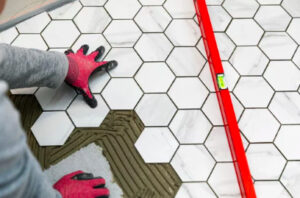
The substrate should be inspected before work begins to ensure it’s suitable for tile installation. The surface should be flat and free of cracks or crumbles. It should be free of wax, grease and gypsum compounds, which can interfere with the bonding process. It should also be dry and well-ventilated to prevent mold and mildew. The substrate should also be free of water or moisture leaks that could lead to structural damage and/or tile failure.
Plywood and cement backer boards are common in new construction homes, but they’re not the only options for a tile substrate. Many existing finishes like vinyl, residential sheet vinyl, concrete and even masonry can be used as tile substrates, but the substrate must be fully cured and properly prepared before installing the tile.
To prepare the substrate for tile, it should be thoroughly cleaned and free of all dust, dirt, oils, grease and wax. It should also be sanded to smooth out any rough areas. Then, the substrate should be primed using a high-quality primer, such as a water-based polyurethane or oil-based aliphatic polyurethane.
Once the primer is dry, it should be sanded again to smooth out any rough areas. Then, a layer of thinset mortar should be applied to the substrate or underlayment using a notched trowel. This notching creates grooves in the mortar that improve adhesion between the substrate and the tile.
It’s important to use the correct thinset for your project, as it will be specific to the type of tile and its location in the home. Choosing the wrong type of thinset can lead to premature cracking, debonding and failure of the tile and grout joints.
Adhesives or Mortar
Choosing the right construction materials for your tiling project is one of the most important decisions you’ll make. It can affect how long your tile lasts, how secure it is to the wall surface and its durability.
There are two main types of adhesives or mortar used for tiling: thinset and tile adhesive. Both are cement-based, but they’re different in composition. Many people confuse these terms and assume they’re the same thing, but it’s important to understand the differences in order to choose the best tile adhesive for your specific project.
Thinset is a type of modified mortar designed specifically for adhering tiles to concrete surfaces. It has a very smooth, slippery consistency and is usually applied with a notched masonry trowel. It’s available in a powder form or premixed, and it can be used for indoor or outdoor projects. Standard thinset mortar is made of Portland cement, silica sand and water-retaining additives. Latex is often added to thinset to ensure it has a longer work time and more flexibility.
While thinset is the more common type of tile adhesive, there are also a number of other options on the market. These include polymer emulsion and reactive resin tile adhesives. These are more expensive than traditional thinset, but they offer a number of advantages, including superior bond strength and elasticity.
Another alternative to thinset is mastic, which is a non-cement-based product that’s similar to mortar but is much faster and easier to apply. Mastic is not compatible with all types of tile, and it has a more volatile chemical makeup than thinset.
The type of adhesive you select for your tiling project should depend on several factors, including whether there’s moisture present in the area and how much movement will be occurring. The right choice will ensure that your tiles stay in place and will not wash away prematurely. It’s also important to consider the environment where you’re installing your tile, as weather can influence how quickly an adhesive will dry and set. If it’s exposed to sunlight, it will cure at a faster rate than if it’s kept in a cool, dark space.
Tiles
A tile project requires a number of tools, from a straightedge and carpenter’s square to measuring devices, snap cutters, wet saws and tile nippers. You will also need a notched trowel and rubber float. In addition, you’ll need an adhesive material that bonds the tiles to the substrate; a thinset is a common option. There are several different types of thinsets on the market, each formulated for a particular type of installation or flooring material. The most commonly used is a modified thinset, which works well for ceramic and porcelain tiles. Other options include unmodified thinset and type one mastic, which is made from the resin of the mastic tree.
There are countless styles of tile available, each with its own aesthetic. From classic subway tile that accentuates a kitchen backsplash to rock pebble tile that gives a bathroom an earthy feel, there’s sure to be a tile to fit your vision.
Tiles are also available in a number of materials, including ceramic and porcelain, natural stone and glass. Choosing a tile that suits your space and style is key to completing a successful project. For instance, ceramic tile is an economical option that comes in a range of colors and sizes, while porcelain offers superior durability. Natural stone tiles like slate, limestone, travertine and sandstone are durable but require regular sealing to protect them against staining and discoloration.
Before you start installing your new tile, it’s important to prepare the surface as thoroughly as possible. Experts recommend a minimum of two layers of underlayment, as bare wood will not be strong enough to support the weight of tile and grout. The thick rosin builder’s paper typically used for this purpose can be purchased from most home improvement or paint supply stores. Cover the floor and countertop surfaces with it, making sure to tape the joints.
Before beginning your tile project, carefully plan the layout and draw a grid on the floor or wall with chalk lines to guide your work. This will help ensure that you end up with a symmetrical, aesthetically pleasing arrangement and will prevent tiles from being placed too close together or too far apart, which can result in uneven wear or even cracking and popping loose.
Layout
Whether it’s a backsplash behind the sink or the center of attention in an eye-catching shower, the layout of your tile installation is a critical factor in how well your finished product looks. Unfortunately, not all installers employ industry standards and best practices that ensure a professional appearance. One such method involves laying tiles with whole pieces along the walls and cut pieces at the edges, which can make for an unbalanced and unattractive arrangement.
To avoid these unsightly results, you should always lay out your pattern before starting the actual tiling. This allows you to see how your pattern will look once it’s installed and helps you spot mistakes or miscalculations that can cause problems later on. To do this, snap a grid of chalk lines on your floor that divides the space into equal quadrants and mark where the center point and baseline will be in each. This will help you end up with a balanced, symmetrical tile layout that’s free of tiny cuts at the edges.
If your layout has a design feature such as a niche or trim around the room, it’s a good idea to pre-lay out the pattern with those pieces. Doing so can save you time and effort by allowing you to tailor the dimensions of each piece to fit perfectly in its intended location. It can also prevent costly mistakes like cutting a full tile too small for a wall niche.
Aside from the basic horizontal straight stack, there are a number of other tile pattern and layout techniques you can use to elevate your design and add a level of polish to your final result. For instance, you can install tiles vertically to elongate a petite space or draw attention to a statement-making bathtub or vanity. Alternatively, you can offset the rows of tiles in your pattern to create an effect similar to brickwork.
This can be as simple as offsetting each tile by one-half its length or as complex as a herringbone pattern that alternates the direction of the diagonals within the pattern. Whichever of these patterns you choose, it’s important to remember that each one will require different grout widths. In the case of a herringbone pattern, this will require larger grout joints, and in the case of an offset brick pattern, you’ll need smaller ones.